Software Guide
A workflow, formatting, and export breakdown for various modeling software.
1. Load or Create a Model
- It is recommended to keep your units in metric system (Maya defaults to centimeters and Blender defaults to meters). Keep these in mind to know the true size of your model.
Maya
- The "Front" facing part of your model should face the positive Z direction.
Blender
- The "Front" facing part of your model should face the negative Y direction.
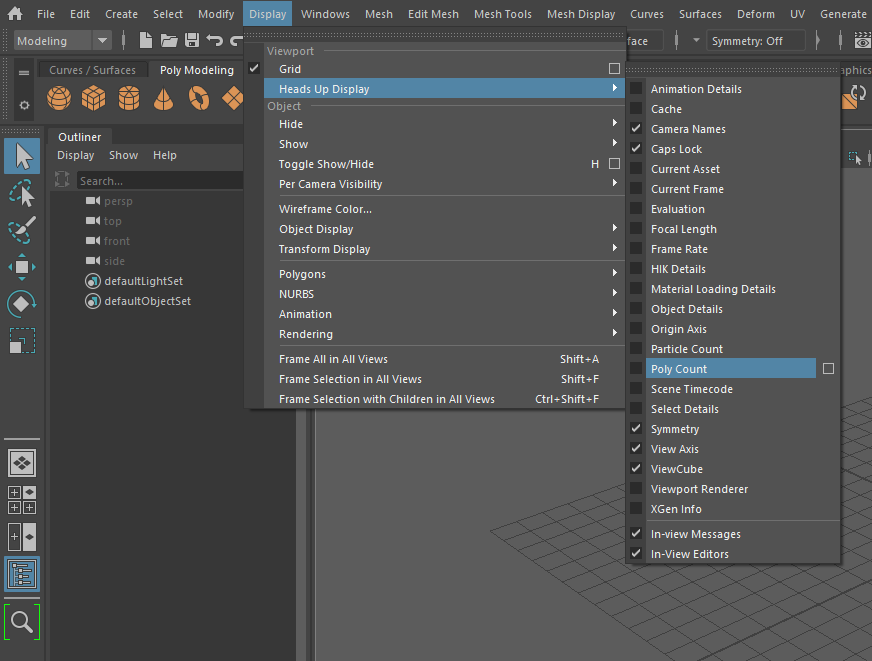
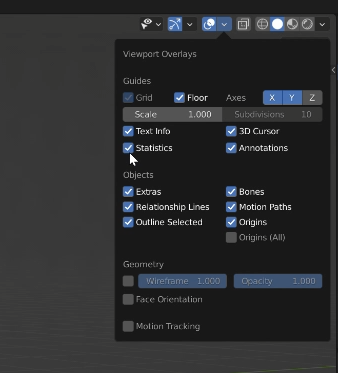
2. Check Triangle Count and Dimensions
- Pull up the statistics to see the triangle count for the model.
Maya
- To check your Triangle Count, toggle the Heads Up Display Poly Count.
Blender
-
To check your Triangle Count, select the model in the viewport and then toggle the statistics to view the triangle count.
- Check the dimension bounds of the Model to know the size and ensure it is within expected bounds.
Maya
-
To check your Model Dimensions use the Universal Manipulator tool. (Shortcut: Select your object then hit 'Ctrl + T' on the Keyboard)
Blender
-
To check your Model Dimensions check the Item Transform Display. (Shortcut: Select your object then hit 'N' on the Keyboard)
3. Optimize Your Model
Maya
-
In Maya you can use some of the Remesh functions available under the Mesh window as you need. It is recommended to check out resources to determine which is best for your model.
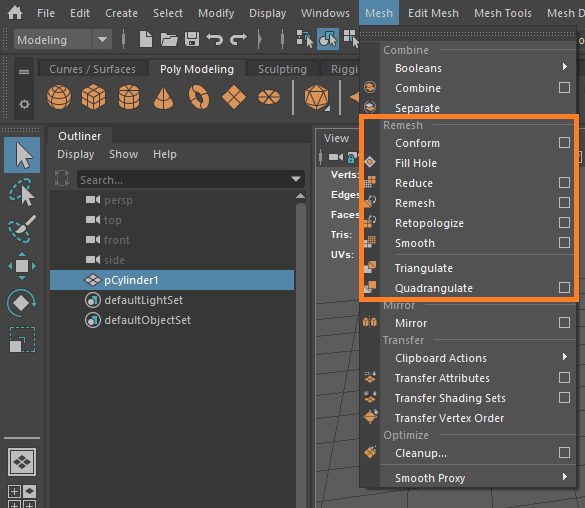
-
Another option is Quad Draw to retopolgize very dense models.
Blender
- Use the Triangulate Modifier
- You can use the Triangulate Modifier to have your model already split into triangles before processing. This lets you control more preciesly how it will look and ensure you are within the limits.
- Use the Decimator Modifier
- If your model goes above the triangle limit you can use the Decimator to Retopologize to help reduce the Triangle count of your model.
4. Join Meshes
Maya
-
Join meshes by selecting them and clicking on
Mesh/Combinebutton. -
After that, it's a good practice to delete all history by selecting the combined mesh and clicking on
Edit/Delete All By Type/Historybutton.
Blender
-
Join meshes by selecting them and pressing
CTRL+Jor by clicking onObject/Join Meshesbutton.
5. Set Pivot Position
The model's pivot should be at the center of the portion of the model that is expected to connect with other surfaces. If the model is to be placed on the ground then the pivot should be at the center bottom of the model. If the model is expected to be hung from a ceiling then the pivot should be at the center of the top part where it is to connect with the ceiling.
Maya
- Set the connecting part of the model to be at the origin and move the pivot to the origin as well.
- Select all the meshes and select Modify → Freeze Transformations
Blender
- Set your object pivot at the origin (Apply needed transform properties)
-
To set the pivot move the model so the connecting part is centered at the origin.
-
Then select from the Object menu Apply → Location
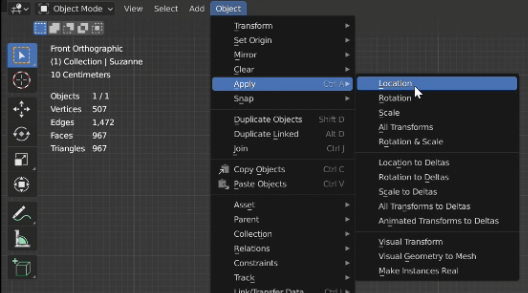
-
Ensure that Rotation is at 0 and Scale is at 1, you can use Apply → Rotation/Scale if needed.
-
6. Check Material Setup
Maya
- For any materials make sure to use textures for the values of Color, Normals, Smoothness/Roughness, or Metallic
Blender
-
Clean up the materials to only have texture nodes connected to the Material Shader.
-
If using extra nodes (eg: Add, Multiply, etc.) then bake out the final Textures and assign those to the shader directly.
-
Incorrect Shader Graph

-
Correct Shader Graph

-
-
For a material to be transparent make sure there is an alpha channel applied on the Base Color texture.
7. Export Embedded Binary FBX
- Prior to exporting, it is recommended to save a copy out in the 3D software file format incase you need to make any other changes.
Maya
- Select your meshes
- File → Export Selection
- Under the File Type Specific Options dropdown open the Include then Animation dropdown and uncheck it
- Under Advanced Options dropdown open the Units section and have Automatic checked and see Scale Factor is 1.0
- Under the Embed Media dropdown check the Embed Media box
- Under the FBX File Format check the Type is Binary
- Then Export FBX
Blender
- Select your meshes
- Export → FBX
- Set Export Path to Copy and select the box next to it to select Embedded Textures
- Use Selected Objects
- Only Mesh type
- Do NOT Apply Transformations
- Do NOT Bake Animations
- Then Export FBX
- You can verify your model exported correctly by opening a new blank Blender scene and importing it.